
Flag #8 - First Experiment to Image Processing with TensorFlow
Caveat: This post is totally written by a beginner in image processing. So please kindly correct me if I'm wrong :)
Background Story
In one peaceful night, I took a bath and as all of you have experienced it before, we will start thinking a lot of things: human evolution, mankind history, Milky Way, and stuffs. Yes, stuffs. On that day, I thought about a problem that I faced in daily lives. Could you guess what my problem is? It is related to 2D characters recognition, where I often see a randomly posted animation characters that I don't know (or forget) about his/her identity. I tried to use Google Image search, but there is often no satisfying result. For animation characters, I also try to use a specialized search engine called iqdb to no avail. If we rethink about it, it seems very strange that we can recognize those faces easily using our own memory while it's so hard for computers to do it.
I've tried to do a random Google search about image processing. I'm wondering how far has our mankind progressed in image recognition with computers. One of the most popular image classification (STL-10) "only" achieves an accuracy of 74.33% with 96 x 96 pixel images. A smaller image size (32 x 32 pixel) has a better result, but as the image size increases, the complexity of object identification in image processing also increases.
On the other hand, I saw a motivating TEDx video which is presented by Josh Kaufman and titled by "The first 20 hours -- how to learn anything". You can access the video from here. The concept is indeed interesting that we can understand the basic of a knowledge in 20 hours. Imperfection always motivates people and image processing with machine learning is currently in that state. So, I've decided to learn a basic of it.
1st Hour
In the past few months, there are a lot of sudden machine learning initiatives. Google released TensorFlow 3 months ago, Microsoft released CNTK (Computational Network Toolkit) less than a month ago, and Microsoft claimed to have a better performance than its competitors.
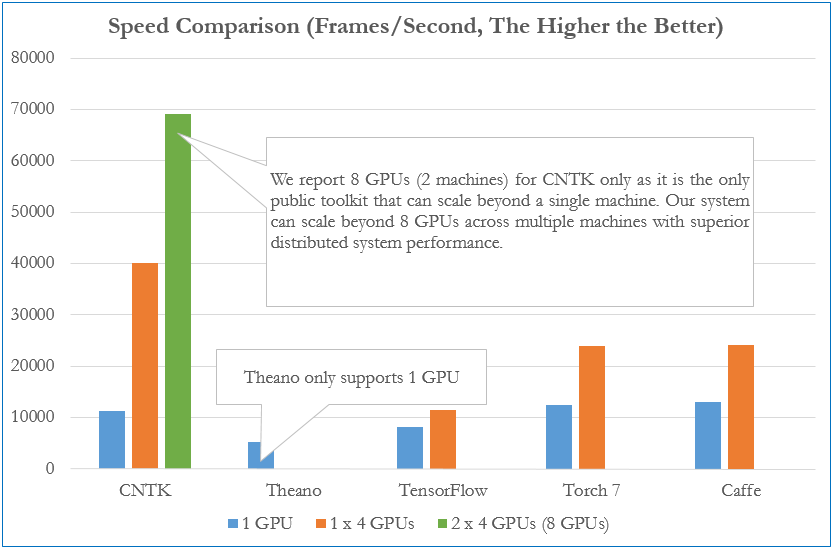
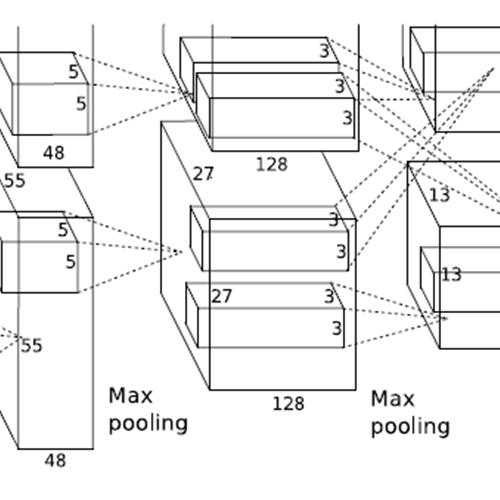
The comparison between TensorFlow, CNTK, Theano, Torch, and Caffe can be accessed here. At this time, I didn't have any idea what a convolutional network is, so I decided to choose the easiest tool with Python interface and best documentation support. The current winner (for me) is TensorFlow, since they provide a detailed tutorial from beginner here.
In addition, I've tried to find some examples of 2D characters recognition and the best one that I could find is http://avallet.vcd.design.kyushu-u.ac.jp/anime_recognizer. Currently, it can identify up to 115 different characters and the author claims that his implementation has an accuracy of 70%. From his blogpost, I realized that I need to learn character detection before proceeding to feature extractions for recognizing 2D characters.

Image source: http://alexisvallet.github.io/posts/anime-character-detection/crossing-gt.jpg
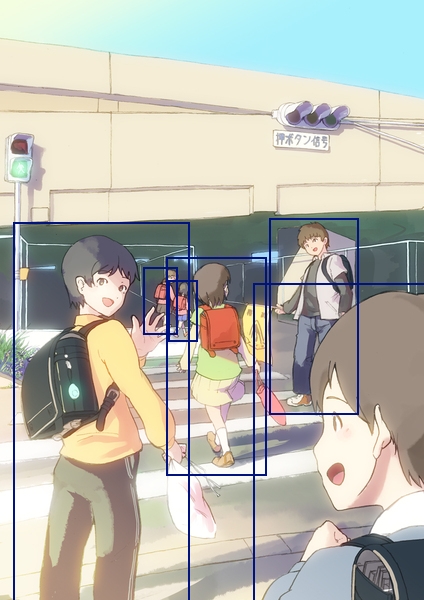
2nd Hour
I've tried to use TensorFlow image recognition API for Python which is provided here. The example is quite easy to follow since Google provides the trained model from Inception-v3 to classify an image into 1000 classes. The writer claims that Inception-v3 achieves a top-5 error rate of 3.46%, which is even better than human's accuracy in identifying object. You can read the article here.
I tried to build TensorFlow from Virtualenv, which I believe the fastest one to start using TensorFlow. After finishing installation, you only need to type two commands to validate your TensorFlow is working properly: cd tensorflow/models/image/imagenet and python classify_image.py. With the provided model, it will classify the cropped panda image into the following results:
giant panda, panda, panda bear, coon bear, Ailuropoda melanoleuca (score = 0.88493)
indri, indris, Indri indri, Indri brevicaudatus (score = 0.00878)
lesser panda, red panda, panda, bear cat, cat bear, Ailurus fulgens (score = 0.00317)
custard apple (score = 0.00149)
earthstar (score = 0.00127)
The result shows it is 88.49% confident that your image is labeled as "giant panda, panda, panda bear, coon bear, Ailuropoda melanoleuca". Since the model tries to measure top-5 error rate, for each test data, there will be five or less result sets with its confidence level.
For your information, if you are interested in Inception-v3, you could read the full paper here.
3rd to 4th Hour
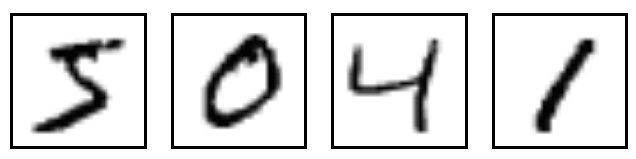
From the beginner guide here, we will use MNIST with softmax (multinomial logistic) regression to classify handwritten digits between 0 - 9.
I've decided to use one entire hour to read two particularly interesting blog posts:
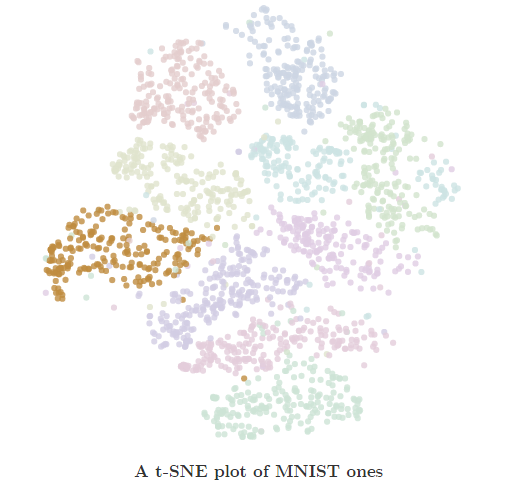
Visualizing MNIST: This blog post is superb. Initially, it visualizes 2 random pixels as a feature from 28 * 28 pixel and tries to create a 2D visualization from it. Instead of using 2 random pixels, it shows us that we can utilize Principal Components Analysis (PCA) to capture the most variance. Then, it starts playing with cost function: from a simple (position 1 - position 2)^2 to t-Distributed Stochastic Neighbor Embedding (t-SNE). In the conclusion section, you will understand why we need higher dimensions for achieving better results in image processing.
Visual Information Theory: This is another hidden gem to understand the concept of cross-entropy. Personally, I've learned the principle of entropy (Shannon entropy) from compression algorithm, so I only spent ~10 minutes in reading the middle part of this article.
It is advised to have a quick read in the beginner guide, so that you can learn a lot of concepts that you haven't understood before proceeding to the hand-on.
5th to 6th Hour
After downloading the provided datasets, I decided to have a quick look to the contents. The training file has 60,000 images which will be divided into two: 55,000 images for training and 5,000 images for validation. All images have an equal size of 28 * 28 pixels. I've tried to print a content of random image and it looks like this:
 [[  0]
  [  0]
  [  0]
  [  0]
  [  0]
  [  0]
  [  0]
  [  0]
  [  0]
  [  0]
  [  0]
  [  0]
  [ 38]
  [254]
  [254]
  [ 77]
  [  0]
  [  0]
  [  0]
  [  0]
  [  0]
  [  0]
  [  0]
  [  0]
  [  0]
  [  0]
  [  0]
  [  0]]
The value is ranged from 0 to 255, where 0 is a white pixel, 255 is a black pixel, and the rest values are in-between.
The code itself can be divided to 3 sections: creating model, training, and evaluation. The complete code that I used can be accessed at https://gist.github.com/freedomofkeima/3def80449362f062c17e.
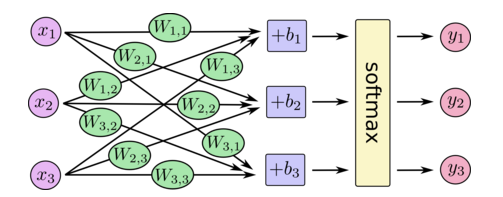
In short, we will have 784 inputs from 28 * 28 pixel of image (x1, x2, ..., x784). With softmax regression, we will have 10 outputs (class "0" to class "9"), which is denoted as y1, y2, ..., y10. Then, we will have a two-dimension array of Weights (W1,1 to W784,10) and one-dimension array of biases (b1 to b10).
For the training part, we will choose 100 images randomly and repeat the entire process for 1000 iterations. In each iteration, we will try to minimize the cross entropy with gradient descent (learning rate = 0.01). If you're curious (I'm curious with the middle process), you can use the following line to know the cross_entropy value.
# Debug line (print entropy every 100 images)
cross_entropy = tf.Print(cross_entropy, [cross_entropy], "CrossE")
If you try to increase the number of random images per batch, you may encounter a strange result. After googling it throughout the internet, I found that I need to use a small value (e.g.: 1e-10) for smoothing.
# Implement cross entropy
# 1e-10 is for smoothing
# See http://stackoverflow.com/a/34364526
cross_entropy = -tf.reduce_sum(y_ * tf.log(y + 1e-10))
I also tried to use other alternatives, such as the following:
train_step = tf.train.AdagradOptimizer(0.01).minimize(cross_entropy)
train_step = tf.train.AdamOptimizer().minimize(cross_entropy)
train_step = tf.train.FtrlOptimizer(0.01).minimize(cross_entropy)
train_step = tf.train.RMSPropOptimizer(0.01, 0.1).minimize(cross_entropy)
The evaluation step is quite simple. We only need to compare class with maximum probability from a testing data to the actual label. Since the image are chosen randomly, the accuracy that you will get is also random (one of the example, 90.78% accuracy is shown below).
Extracting MNIST_data/train-images-idx3-ubyte.gz
Extracting MNIST_data/train-labels-idx1-ubyte.gz
Extracting MNIST_data/t10k-images-idx3-ubyte.gz
Extracting MNIST_data/t10k-labels-idx1-ubyte.gz
I tensorflow/core/common_runtime/local_device.cc:40] Local device intra op parallelism threads: 8
I tensorflow/core/common_runtime/direct_session.cc:58] Direct session inter op parallelism threads: 8
0.9078
7th to 8th Hour
In this section, I tried to explore "Deep MNIST for Experts" which is provided here. Since I'm still trying to learning this "Deep Convolutional Neural Networks" thing, I cannot explain how it works perfectly here.
Anyway, the complete code that I used for this section can be accessed at https://gist.github.com/freedomofkeima/f41bb8dff547d18088b3.
For this experimentation, we will use two convolutional layers, one densely connected layer, and one softmax layer. The interesting concept here is "Dropout", where we will apply certain probability to dropped-out a node. The dropped-out node will also have its incoming and outgoing edge removed. If you're familiar with machine learning, you should have learned the concept of overfitting. Dropout in convolutional layer is one technique to reduce it. This technique makes the learning process faster and we can avoid tightly fitted interactions between two connected nodes. In TensorFlow, we can simply use these lines:
## Dropout
# In order to prevent overfitting, we will turn dropout on during training (only)
keep_prob = tf.placeholder("float")
h_fc1_drop = tf.nn.dropout(h_fc1, keep_prob)
This learning process is slower than the previous one, since we will use 20,000 iterations with learning rate of 1e-4. However, this technique significantly increases the accuracy of MNIST datasets to ~99%.
Next Plan
This blog post took 2 hours to write and I've already used 8 hours in learning it. I hope I could find something new and more interesting in the next 10 hours slot. Currently, I'm trying to increase the limit of GPU instances (g2.2xlarge) in AWS. It's currently limited to 0, so I could not use GPU instances right now :(. My next plan for now is to try utilizing cuDNN from TensorFlow in AWS. In addition, I want to learn layer variations in deep convolutional network.
Anyway, if you have good resources for learning image classification or recognition, please share it with me! Thank you for reading this blog post, see you next time!
Alias
Alias
Iskandar Setiadi
Luca
Iskandar Setiadi